Dev/Android
Android (스크롤 뷰, 슬라이딩 드로어, 뷰 플리퍼, 탭 호스트, 웹뷰, 매니페스트 수정)
Walker_
2024. 4. 25. 16:52
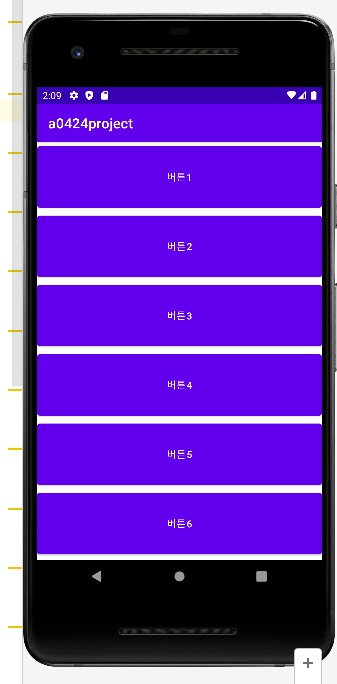
1. 스크롤 뷰
<?xml version="1.0" encoding="utf-8"?>
<ScrollView xmlns:android="http://schemas.android.com/apk/res/android"
    android:layout_width="match_parent"
    android:orientation="vertical"
    android:layout_height="match_parent">

    <LinearLayout
        android:layout_width="match_parent"
        android:layout_height="match_parent"
        android:orientation="vertical">

        <Button
            android:layout_width="match_parent"
            android:layout_height="100dp"
            android:text="버튼1"/>

        <Button
            android:layout_width="match_parent"
            android:layout_height="100dp"
            android:text="버튼2"/>

        <Button
            android:layout_width="match_parent"
            android:layout_height="100dp"
            android:text="버튼3"/>

        <Button
            android:layout_width="match_parent"
            android:layout_height="100dp"
            android:text="버튼4"/>

        <Button
            android:layout_width="match_parent"
            android:layout_height="100dp"
            android:text="버튼5"/>

        <Button
            android:layout_width="match_parent"
            android:layout_height="100dp"
            android:text="버튼6"/>

        <Button
            android:layout_width="match_parent"
            android:layout_height="100dp"
            android:text="버튼7"/>

        <Button
            android:layout_width="match_parent"
            android:layout_height="100dp"
            android:text="버튼8"/>

        <Button
            android:layout_width="match_parent"
            android:layout_height="100dp"
            android:text="버튼9"/>

        <Button
            android:layout_width="match_parent"
            android:layout_height="100dp"
            android:text="버튼10"/>

    </LinearLayout>

</ScrollView>
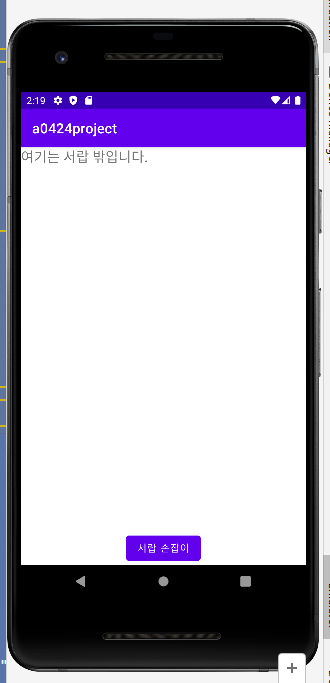
2. 슬라이딩드로어
- 서랍을 뜻하는 슬라이딩드로어 SlidingDrawer는 위젯을 서랍처럼 열어서 보여주거나 닫아서 감춤.
- 슬라이딩드로어는 보통 다음과 같은 형태
<?xml version="1.0" encoding="utf-8"?>
<LinearLayout xmlns:android="http://schemas.android.com/apk/res/android"
    android:orientation="vertical"
    android:layout_width="match_parent"
    android:layout_height="match_parent">

    <TextView
        android:layout_width="match_parent"
        android:layout_height="wrap_content"
        android:text="여기는 서랍 밖입니다."
        android:textSize="20dp"/>

    <SlidingDrawer
        android:id="@+id/slidingDrawer1"
        android:layout_width="match_parent"
        android:layout_height="match_parent"
        android:content="@+id/content"
        android:handle="@+id/handle">

        <Button
            android:id="@+id/handle"
            android:layout_width="wrap_content"
            android:layout_height="wrap_content"
            android:text="서랍 손잡이"/>

        <LinearLayout
            android:id="@+id/content"
            android:layout_width="match_parent"
            android:layout_height="match_parent"
            android:background="#00ff00"
            android:gravity="center">

            <TextView
                android:layout_width="wrap_content"
                android:layout_height="wrap_content"
                android:text="여기는 서랍 안입니다."
                android:textSize="20dp"/>
        </LinearLayout>
    </SlidingDrawer>
</LinearLayout>

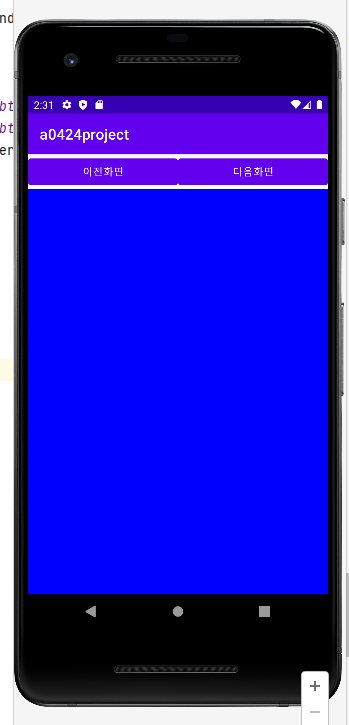
3. 뷰 플리퍼
- 안에 여러 개의 위젯을 배치하고 필요에 따라 화면을 왼쪽이나 오른쪽으로 밀어서 위젯을 하나씩 화면에 보여주는
- 방식의 뷰 컨테이너.
<?xml version="1.0" encoding="utf-8"?>
<LinearLayout xmlns:android="http://schemas.android.com/apk/res/android"
    android:layout_width="match_parent"
    android:orientation="vertical"
    android:layout_height="match_parent">

    <LinearLayout
        android:layout_width="match_parent"
        android:layout_height="wrap_content"
        android:orientation="horizontal">

        <Button
            android:id="@+id/btnPrev"
            android:layout_width="wrap_content"
            android:layout_height="wrap_content"
            android:layout_weight="1"
            android:text=" 이전화면 "/>

        <Button
            android:id="@+id/btnNext"
            android:layout_width="wrap_content"
            android:layout_height="wrap_content"
            android:layout_weight="1"
            android:text=" 다음화면 "/>
    </LinearLayout>

    <ViewFlipper
        android:id="@+id/viewFlipper1"
        android:layout_width="match_parent"
        android:layout_height="match_parent">

        <LinearLayout
            android:layout_width="match_parent"
            android:layout_height="match_parent"
            android:background="#ff0000">
        </LinearLayout>

        <LinearLayout
            android:layout_width="match_parent"
            android:layout_height="match_parent"
            android:background="#00ff00">
        </LinearLayout>

        <LinearLayout
            android:layout_width="match_parent"
            android:layout_height="match_parent"
            android:background="#0000ff">
        </LinearLayout>

    </ViewFlipper>

</LinearLayout>
package kr.jeongmo.a0424project
import androidx.appcompat.app.AppCompatActivity
import android.os.Bundle
import android.widget.*
class MainActivity : AppCompatActivity() {
override fun onCreate(savedInstanceState: Bundle?) {
super.onCreate(savedInstanceState)
setContentView(R.layout.a04_viewplifer)
val btnPrev = findViewById<Button>(R.id.btnPrev)
val btnNext = findViewById<Button>(R.id.btnNext)
val viewFlipper = findViewById<ViewFlipper>(R.id.viewFlipper1)
btnPrev.setOnClickListener {
viewFlipper.showPrevious()
}
btnNext.setOnClickListener {
viewFlipper.showNext()
}
}
}

4. 탭호스트
- 뷰플리퍼가 차례대로 다음이나 이전 화면을 보여주는 기능을 하는 반면
<?xml version="1.0" encoding="utf-8"?>
<TabHost xmlns:android="http://schemas.android.com/apk/res/android"
    android:id="@android:id/tabhost"
    android:layout_width="match_parent"
    android:layout_height="match_parent">

    <LinearLayout
        android:id="@+id/linearLayout1"
        android:layout_width="match_parent"
        android:layout_height="match_parent"
        android:orientation="vertical">

        <TabWidget
            android:id="@android:id/tabs"
            android:layout_width="match_parent"
            android:layout_height="wrap_content"/>

        <FrameLayout
            android:id="@android:id/tabcontent"
            android:layout_width="match_parent"
            android:layout_height="match_parent">

            <LinearLayout
                android:id="@+id/tabSong"
                android:background="#f00000"
                android:orientation="vertical"
                android:layout_width="match_parent"
                android:layout_height="match_parent">
            </LinearLayout>

            <LinearLayout
                android:id="@+id/tabArtist"
                android:background="#f0f000"
                android:orientation="vertical"
                android:layout_width="match_parent"
                android:layout_height="match_parent">
            </LinearLayout>

            <LinearLayout
                android:id="@+id/tabAlbum"
                android:background="#f00000"
                android:orientation="vertical"
                android:layout_width="match_parent"
                android:layout_height="match_parent">
            </LinearLayout>


        </FrameLayout>

    </LinearLayout>

</TabHost>
package kr.jeongmo.a0424project

import android.app.TabActivity
import androidx.appcompat.app.AppCompatActivity
import android.os.Bundle
import android.widget.*

class MainActivity : TabActivity() {

    override fun onCreate(savedInstanceState: Bundle?) {
        super.onCreate(savedInstanceState)
        setContentView(R.layout.a06_taphost)

        /* tab host */
        val tabHost = this.tabHost

        val tabSpecSong = tabHost.newTabSpec("SONG").setIndicator("음악별")
        tabSpecSong.setContent(R.id.tabSong)
        tabHost.addTab(tabSpecSong)

        val tabSpecArtist = tabHost.newTabSpec("ARTIST").setIndicator("가수별")
        tabSpecArtist.setContent(R.id.tabArtist)
        tabHost.addTab(tabSpecArtist)

        val tabSpecAlbum = tabHost.newTabSpec("ALBUM").setIndicator("앨범별")
        tabSpecAlbum.setContent(R.id.tabAlbum)
        tabHost.addTab(tabSpecAlbum)

        tabHost.currentTab = 0
    }
}
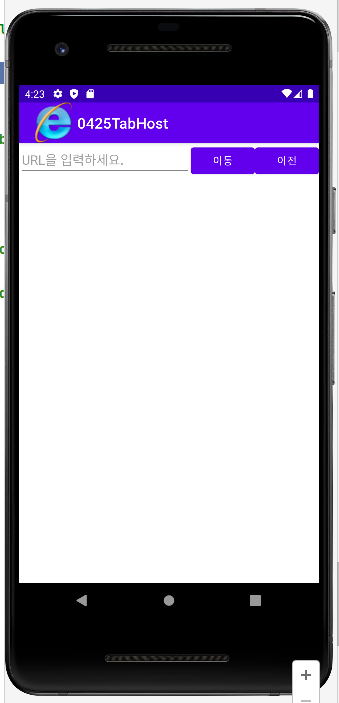
5. 웹뷰
- 사용자가 브라우저를 앱에서 사용하는 기능
<?xml version="1.0" encoding="utf-8"?>
<LinearLayout xmlns:android="http://schemas.android.com/apk/res/android"
    xmlns:app="http://schemas.android.com/apk/res-auto"
    xmlns:tools="http://schemas.android.com/tools"
    android:layout_width="match_parent"
    android:layout_height="match_parent"
    android:orientation="vertical"
    tools:context=".MainActivity">

    <LinearLayout
        android:layout_width="match_parent"
        android:layout_height="wrap_content">

        <EditText
            android:layout_width="wrap_content"
            android:layout_height="wrap_content"
            android:id="@+id/editURL"
            android:layout_weight="1"
            android:hint="URL을 입력하세요."
            android:singleLine="true"/>

        <Button
            android:layout_width="wrap_content"
            android:layout_height="wrap_content"
            android:id="@+id/btnGo"
            android:text="이동"/>

        <Button
            android:layout_width="wrap_content"
            android:layout_height="wrap_content"
            android:id="@+id/btnBack"
            android:text="이전"/>
    </LinearLayout>

    <WebView
        android:layout_width="match_parent"
        android:layout_height="match_parent"
        android:id="@+id/webView"
        android:clickable="true"/>
</LinearLayout>
android:icon="@drawable/emo_im_cool"
android:roundIcon="@drawable/web"
- manifests 파일에 위 코드 두줄로 변경
android:logo="@drawable/web"
android:label="@string/app_name"
- 둘 다 코드 작성
- logo : 실행된 화면의 상단에 보이는 로고 모양을 설정. res - drawable 폴더에 파일을 복사.
- label : 앱의 레이블을 지정. 안드로이드의 앱 정보 창에 보이는 이름.
package kr.jeongmo.a0425tabhost

import androidx.appcompat.app.AppCompatActivity
import android.os.Bundle

class MainActivity : AppCompatActivity() {

    override fun onCreate(savedInstanceState: Bundle?) {
        super.onCreate(savedInstanceState)
        setContentView(R.layout.activity_main)

        supportActionBar?.setDisplayShowHomeEnabled(true)
        supportActionBar?.setIcon(R.drawable.web)
    }
}
- 액티비티 파일에 위 코드 추가
- 상단 로고와 아이콘 변경 확인
class MainActivity : AppCompatActivity() {

    lateinit var editURL : EditText
    lateinit var btnGo : Button
    lateinit var btnBack : Button
    lateinit var webView : WebView

    override fun onCreate(savedInstanceState: Bundle?) {
        super.onCreate(savedInstanceState)
        setContentView(R.layout.activity_main)

        supportActionBar?.setDisplayShowHomeEnabled(true)
        supportActionBar?.setIcon(R.drawable.web)

        editURL = findViewById(R.id.editURL)
        btnGo = findViewById(R.id.btnGo)
        btnBack = findViewById(R.id.btnBack)
        webView = findViewById(R.id.webView)
    }
}
- 메인 액티비티 파일 위 코드로 변경

- class 코드 따라서 생성 후 내부에서 Alt + Ins > Override Methods
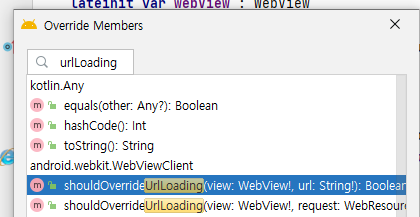
- 창에서 urlLoading 검색 후 > Boolean (더 짧은 메소드) 추가
package kr.jeongmo.a0425tabhost

import androidx.appcompat.app.AppCompatActivity
import android.os.Bundle
import android.webkit.WebView
import android.webkit.WebViewClient
import android.widget.Button
import android.widget.EditText

class MainActivity : AppCompatActivity() {

    lateinit var editURL : EditText
    lateinit var btnGo : Button
    lateinit var btnBack : Button
    lateinit var webView : WebView


    override fun onCreate(savedInstanceState: Bundle?) {
        super.onCreate(savedInstanceState)
        setContentView(R.layout.activity_main)

        supportActionBar?.setDisplayShowHomeEnabled(true)
        supportActionBar?.setIcon(R.drawable.web)

        editURL = findViewById(R.id.editURL)
        btnGo = findViewById(R.id.btnGo)
        btnBack = findViewById(R.id.btnBack)
        webView = findViewById(R.id.webView)

        webView.webViewClient = myWebViewClient()

        val webSet = webView.settings
        webSet.builtInZoomControls = true
        webSet.javaScriptEnabled = true

        btnGo.setOnClickListener {
            webView.loadUrl(editURL.text.toString())
        }

        btnBack.setOnClickListener {
            webView.goBack()
        }
    }

    class myWebViewClient : WebViewClient() {
        override fun shouldOverrideUrlLoading(view: WebView?, url: String?): Boolean {
            return super.shouldOverrideUrlLoading(view, url)
        }
    }
}
<?xml version="1.0" encoding="utf-8"?>
<manifest xmlns:android="http://schemas.android.com/apk/res/android"
    package="kr.jeongmo.a0425tabhost">
    <uses-permission android:name="android.permission.INTERNET"/>

    <application
        android:allowBackup="true"
        android:icon="@drawable/emo_im_cool"
        android:roundIcon="@drawable/emo_im_cool"
        android:logo="@drawable/web"
        android:label="@string/app_name"
        android:supportsRtl="true"
        android:usesCleartextTraffic="true"
        android:theme="@style/Theme.0425TabHost">
        <activity
            android:name=".MainActivity"
            android:exported="true">
            <intent-filter>
                <action android:name="android.intent.action.MAIN" />

                <category android:name="android.intent.category.LAUNCHER" />
            </intent-filter>
        </activity>
    </application>

</manifest>
- manifests 파일
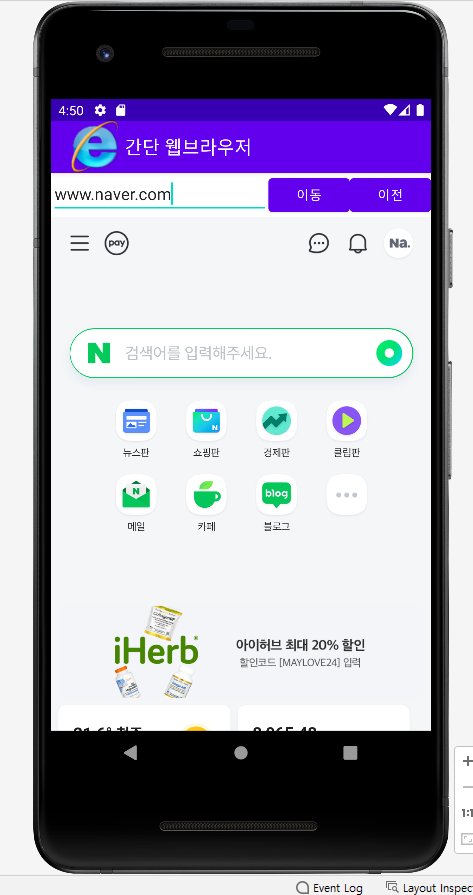
- 실행 해서 정상 작동 확인
공부 과정을 정리한 것이라 내용이 부족할 수 있습니다.
부족한 내용은 추가 자료들로 보충해주시면 좋을 것 같습니다.
읽어주셔서 감사합니다 :)