Android (레이아웃의 기본 개념, 레이아웃의 종류, 리니어레이아웃, gravity / layout_gravity, baselineAligned, 중복 리니어레이아웃 형태, layout_weight, 연습문제, 렐러티브 레이아웃, 테이블 레이아웃, 그리..
1. 레이아웃의 기본 개념
- 안에 존재하는 위젯을배치하게 해줌
- 가장 많이 사용하는 레이아웃은 리니어레이아웃이며, 이를 선형 레이아웃이라고 함
- 레이아웃의 대표적인 속성
- orientation : 배치할 위젯의 수직 또는 수평 방향을 설정
- gravity : 레이아웃 안에 배치할 위젯의 정렬방향을 좌측, 우측, 중앙 등으로 설정
- padding : 레이아웃 안에 배치할 위젯의 여백을 설정
2. 레이아웃의 종류
- 리니어 레이아웃
- 왼쪽 위부터 아래쪽 또는 오른쪽으로 차례로 배치
- 렐러티브레이아웃 (상대 레이아웃)
- 위젯 자신이 속한 레이아웃의 상하좌우 위치를 지정하여 배치하거나 다른 위젯으로부터 상대적인 위치를 지정
- 테이블레이아웃
- 행과 열의 개수를 지정한 테이블 형태로 위젯을 배열
- 그리드레이아웃
- 테이블레이아웃과 비슷하지만 행 또는 열을 확장하여 다양하게 배치할 때 편리
- 프레임레이아웃
- 위젯을 왼쪽위에 일률적으로 겹쳐서 배치하여 중복되어 보이는 효과를 낼 수 있음
- 여러 개의 위젯을 배치한 후 상황에 따라 필요한 위젯을 보이는 방식을 주로 활용
- 리니어레이아웃으로 대부분 가능하여, 리니어를 이해하면 다른 것도 대부분 가능
3. 기본 리니어레이아웃의 형태
- 가장 기본적인 속성은 orientation이며 값으로 vertical, horizontal 작성 가능
- orientation을 vertical로 하면 수직으로 위젯 배치
<?xml version="1.0" encoding="utf-8"?>
<LinearLayout xmlns:android="http://schemas.android.com/apk/res/android"
    xmlns:app="http://schemas.android.com/apk/res-auto"
    xmlns:tools="http://schemas.android.com/tools"
    android:layout_width="match_parent"
    android:layout_height="match_parent"
    android:orientation="vertical"
    tools:context=".MainActivity">

    <TextView
        android:id="@+id/textView1"
        android:layout_width="wrap_content"
        android:layout_height="wrap_content"
        android:text="Textview"/>

    <CheckBox
        android:id="@+id/checkBox1"
        android:layout_width="wrap_content"
        android:layout_height="wrap_content"
        android:text="CheckBox"/>

    <RadioButton
        android:id="@+id/radioButton1"
        android:layout_width="wrap_content"
        android:layout_height="wrap_content"
        android:text="RadioButton"/>

    <Switch
        android:id="@+id/switch1"
        android:layout_width="wrap_content"
        android:layout_height="wrap_content"
        android:text="Switch"/>
</LinearLayout>

- orientation을 horizontal로 하면 수평 배치
android:orientation="horizontal"
- horizontal 일 때 넓이를 match_pareant로 하면 다른 위젯이 안 보임
android:layout_width="match_parent"

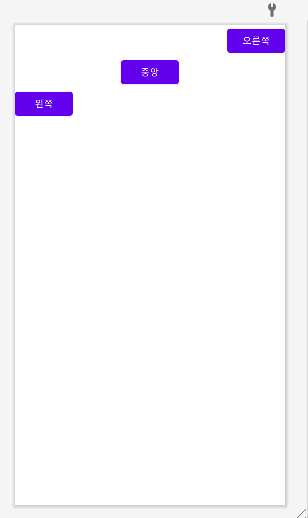
4. gravity와 layout_gravity 속성
- 그래비티 속성으로 레이아웃 안의 위젯을 어디에 배치할 것 인지를 결정하며 값으로 left, right, center, top, bottom 등을
- 사용할 수 있음. 2개를 조합하여 right|bottom을 주면 아래 처럼 된다
android:gravity="right|bottom"

- 그래비티 속성이 자신에게 포함된 자식을 어디에 위치시킬지 정한다면,
- 레이아웃_그래비티 속성을 자신을 어디에 위치시킬지 결정
<?xml version="1.0" encoding="utf-8"?>
<LinearLayout xmlns:android="http://schemas.android.com/apk/res/android"
    xmlns:app="http://schemas.android.com/apk/res-auto"
    xmlns:tools="http://schemas.android.com/tools"
    android:layout_width="match_parent"
    android:layout_height="match_parent"
    android:orientation="vertical"
    tools:context=".MainActivity">

    <Button
        android:id="@+id/button1"
        android:layout_width="wrap_content"
        android:layout_height="wrap_content"
        android:layout_gravity="right"
        android:text="오른쪽"/>

    <Button
        android:id="@+id/button2"
        android:layout_width="wrap_content"
        android:layout_height="wrap_content"
        android:layout_gravity="center"
        android:text="중앙"/>

    <Button
        android:id="@+id/button3"
        android:layout_width="wrap_content"
        android:layout_height="wrap_content"
        android:layout_gravity="left"
        android:text="왼쪽"/>

</LinearLayout>
5. baselineAligned 속성
- 크기가 다른 위젯들을 보기 좋게 정렬해주는 것으로 true와 false를 지정
- 요소들의 글자 배열
6. 중복 리니어레이아웃 형태
- 한 화면에 수평과 수직으로 다양하게 사용하는 경우
- 안드로이드 화면 중 많이 사용되는 방식
7. layout_weight 속성
- 리니어레이아웃을 여러 개를 사용할 경우 각 레이아웃의 크기를 지정해야 함
- 주로 전체 화면 % 비율로 작성하는데, 그 때 layout_weight를 사용
- 코드 작성 (weight 속성 추가 전)
<?xml version="1.0" encoding="utf-8"?>
<LinearLayout xmlns:android="http://schemas.android.com/apk/res/android"
    android:orientation="vertical"
    android:layout_width="match_parent"
    android:layout_height="match_parent">

    <LinearLayout
        android:layout_width="match_parent"
        android:layout_height="match_parent"
        android:gravity="center"
        android:orientation="vertical">

        <Button
            android:layout_width="wrap_content"
            android:layout_height="wrap_content"
            android:text="버튼1"/>

        <Button
            android:layout_width="wrap_content"
            android:layout_height="wrap_content"
            android:text="버튼2"/>

    </LinearLayout>

    <LinearLayout
        android:layout_width="match_parent"
        android:layout_height="match_parent"
        android:background="#00FF00"
        android:layout_gravity="center"
        android:orientation="horizontal">

        <Button
            android:layout_width="wrap_content"
            android:layout_height="wrap_content"
            android:text="버튼1"/>

        <Button
            android:layout_width="wrap_content"
            android:layout_height="wrap_content"
            android:text="버튼2"/>

    </LinearLayout>

    <LinearLayout
        android:layout_width="match_parent"
        android:layout_height="match_parent"
        android:background="#0000FF"
        android:layout_gravity="center"
        android:orientation="vertical">

        <Button
            android:layout_width="wrap_content"
            android:layout_height="wrap_content"
            android:text="버튼1"/>

        <Button
            android:layout_width="wrap_content"
            android:layout_height="wrap_content"
            android:text="버튼2"/>

    </LinearLayout>

</LinearLayout>
- 각 레이아웃에 weight 속성값 추가
android:layout_weight="1"

- layout_height 높이를 0dp로 하면 비율에 맞게 수정 잘 됨
android:layout_height="0dp"android:layout_weight="1"
android:layout_weight="2"
android:layout_weight="1"

8. 연습문제
- 리니어 레이아웃의 orientation 속성을 vertical로 설정
- 버튼 3개를 생성하고 버튼의 layout_width는 110dp, height는 100dp로 함
<?xml version="1.0" encoding="utf-8"?>
<LinearLayout xmlns:android="http://schemas.android.com/apk/res/android"
    android:orientation="vertical"
    android:layout_width="match_parent"
    android:layout_height="match_parent">

    <Button
        android:layout_width="110dp"
        android:layout_height="100dp"
        android:layout_gravity="center"
        android:gravity="right|top"
        android:text="버튼1"/>
    <Button
        android:layout_width="110dp"
        android:layout_height="100dp"
        android:layout_gravity="left"
        android:gravity="left|center"
        android:text="버튼2"/>
    <Button
        android:layout_width="110dp"
        android:layout_height="100dp"
        android:gravity="right|bottom"
        android:layout_gravity="right"
        android:text="버튼2"/>

</LinearLayout>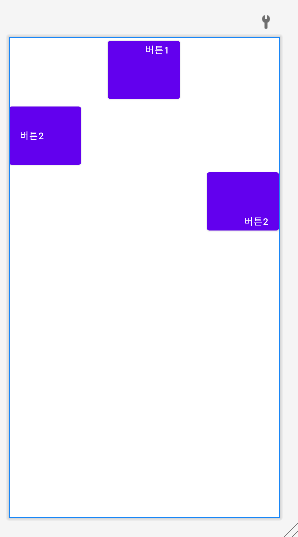
9. 렐러티브 레이아웃
- 리니어레이아웃보다 활용도는 낮지만 리니어레이아웃으로 배치하기 어려울 때 사용하면 편리
- 상대 레이아웃이라고도 하며, 이름처럼 레이아웃 내부에 포함된 위젯을 상대적인 위치로 배치
- 안에 포함된 위젯을 어디쯤에 위치할 것인지 지정해야 함
- 1) 상하좌우에 배치하는 경우와 2) 다른 위젯의 상대 위치에 배치하는 경우로 나뉨
<?xml version="1.0" encoding="utf-8"?>
<RelativeLayout xmlns:android="http://schemas.android.com/apk/res/android"
    android:layout_width="match_parent"
    android:layout_height="match_parent">

    <Button
        android:layout_width="wrap_content"
        android:layout_height="wrap_content"
        android:layout_alignParentTop="true"
        android:layout_centerHorizontal="true"
        android:text="위쪽"/>
    <Button
        android:layout_width="wrap_content"
        android:layout_height="wrap_content"
        android:layout_alignParentLeft="true"
        android:layout_centerVertical="true"
        android:text="좌측"/>
    <Button
        android:layout_width="wrap_content"
        android:layout_height="wrap_content"
        android:layout_centerInParent="true"
        android:text="중앙"/>
    <Button
        android:layout_width="wrap_content"
        android:layout_height="wrap_content"
        android:layout_alignParentBottom="true"
        android:layout_centerHorizontal="true"
        android:text="아래"/>
    <Button
        android:layout_width="wrap_content"
        android:layout_height="wrap_content"
        android:layout_alignParentRight="true"
        android:layout_centerVertical="true"
        android:text="우측"/>


</RelativeLayout>
- 레이아웃의 어느 위치에 배치할지를 결정하는 속성은 모두 일곱가지
- 다른 위젯의 상대 위치에 배치
- 릴레티브레이아웃 안에서 다른 위젯과 상대적으로 위치 지정 (좀 복잡)
<RelativeLayout xmlns:android="http://schemas.android.com/apk/res/android"
    android:layout_width="match_parent"
    android:layout_height="match_parent"
    android:padding="7dip">
    <Button
        android:id="@+id/baseButton"
        android:layout_width="wrap_content"
        android:layout_height="wrap_content"
        android:layout_centerInParent="true"
        android:text="기준 위젯"/>
    <Button
        android:layout_width="wrap_content"
        android:layout_height="wrap_content"
        android:layout_above="@+id/baseButton"
        android:text="above"/>
    <Button
        android:layout_width="wrap_content"
        android:layout_height="wrap_content"
        android:layout_below="@+id/baseButton"
        android:text="below"/>
    <Button
        android:layout_width="wrap_content"
        android:layout_height="wrap_content"
        android:layout_toLeftOf="@+id/baseButton"
        android:text="toLeftOf"/>
    <Button
        android:layout_width="wrap_content"
        android:layout_height="wrap_content"
        android:layout_toRightOf="@+id/baseButton"
        android:text="toRightOf"/>
</RelativeLayout>

<RelativeLayout xmlns:android="http://schemas.android.com/apk/res/android"
    android:layout_width="match_parent"
    android:layout_height="match_parent"
    android:padding="7dip">
    <Button
        android:id="@+id/baseButton"
        android:layout_width="wrap_content"
        android:layout_height="400dp"
        android:layout_centerInParent="true"
        android:text="기준 위젯"/>
    <Button
        android:layout_width="100dp"
        android:layout_height="70dp"
        android:layout_alignTop="@+id/baseButton"
        android:text="alignTop"/>
    <Button
        android:layout_width="100dp"
        android:layout_height="70dp"
        android:layout_alignBaseline="@+id/baseButton"
        android:text="alignBaseline"/>
    <Button
        android:layout_width="100dp"
        android:layout_height="70dp"
        android:layout_alignBottom="@+id/baseButton"
        android:text="alignBottom"/>

</RelativeLayout>
10. 테이블 레이아웃
- 위젯을 표 형태로 배치하는 레이아웃
- <TableRow>를 함께 사용하는데 <TableRow>의 수가 바로 행의 수
- 그리고 행의 수는 <TableRow>안에 위젯의 수
- 속성
- layout_span, column : 테이블레이아웃 안에 포함된 위젯에 설정하는 속성
- 열을 합쳐서 표시하라는 의미 예를 들어, span = 2 > 현재 셀부터 2개의 셀을합쳐서 표시
- column은 지정된 열에 현재 위젯을 표시하라는 의미
<?xml version="1.0" encoding="utf-8"?>
<TableLayout xmlns:android="http://schemas.android.com/apk/res/android"
    android:id="@+id/tableLayout1"
    android:layout_width="match_parent"
    android:layout_height="match_parent">

    <TableRow>
        <Button
            android:layout_width="60dp"
            android:text="1"
            />
        <Button
            android:layout_width="60dp"
            android:layout_span="2"
            android:text="2"
            />
        <Button
            android:layout_width="60dp"
            android:text="3"
            />
    </TableRow>

    <TableRow>
        <Button
            android:layout_width="60dp"
            android:layout_column="1"
            android:text="4"
            />
        <Button
            android:layout_width="60dp"
            android:text="5"
            />
        <Button
            android:layout_width="60dp"
            android:text="6"
            />
    </TableRow>

</TableLayout>
11. 그리드 레이아웃
- 속성
- rowCount : 행의 수
- columnCount : 열의 수
- orientation : 수직, 수평 방향 결정
<?xml version="1.0" encoding="utf-8"?>
<GridLayout xmlns:android="http://schemas.android.com/apk/res/android"
    android:layout_width="wrap_content"
    android:layout_height="wrap_content"
    android:columnCount="4"
    android:rowCount="2">

    <Button
        android:layout_gravity="fill_vertical"
        android:layout_column="0"
        android:layout_row="0"
        android:layout_rowSpan="2"
        android:text="1" />
    <Button
        android:layout_gravity="fill_horizontal"
        android:layout_column="1"
        android:layout_rowSpan="2"
        android:layout_row="0"
        android:text="2" />
    <Button
        android:layout_column="3"
        android:layout_row="0"
        android:text="3" />
    <Button
        android:layout_column="1"
        android:layout_row="1"
        android:text="4" />
    <Button
        android:layout_column="2"
        android:layout_row="1"
        android:text="5" />
    <Button
        android:layout_column="3"
        android:layout_row="1"
        android:text="6" />


</GridLayout>
12. 프레임 레이아웃
- 레이아웃이 쌓이는 형식
<?xml version="1.0" encoding="utf-8"?>
<FrameLayout xmlns:android="http://schemas.android.com/apk/res/android"
    android:layout_width="match_parent"
    android:foreground="@drawable/ic_launcher_background"
    android:foregroundGravity="center|fill_horizontal"
    android:layout_height="match_parent">

    <RatingBar
        android:id="@+id/ratingBar1"
        android:layout_width="wrap_content"
        android:layout_height="wrap_content"/>

    <ImageView
        android:id="@+id/imageView1"
        android:layout_width="wrap_content"
        android:layout_height="wrap_content"
        android:src="@drawable/cat"/>

    <CheckBox
        android:id="@+id/checkBox1"
        android:layout_width="wrap_content"
        android:layout_height="wrap_content"
        android:text="CheckBox"/>

</FrameLayout>
13. 연습문제
- 리니어 레이아웃을 이용하여 각각 다른 색 작성
<?xml version="1.0" encoding="utf-8"?>
<LinearLayout xmlns:android="http://schemas.android.com/apk/res/android"
    android:orientation="vertical"
    android:layout_width="match_parent"
    android:layout_height="match_parent">

    <LinearLayout
        android:layout_width="match_parent"
        android:layout_height="match_parent"
        android:layout_weight="1">

        <LinearLayout
            android:layout_width="match_parent"
            android:layout_height="match_parent"
            android:background="#FF0000"
            android:layout_weight="1">
        </LinearLayout>

        <LinearLayout
            android:layout_width="match_parent"
            android:layout_height="match_parent"
            android:orientation="vertical"
            android:layout_weight="1">

            <LinearLayout
                android:layout_width="match_parent"
                android:layout_height="match_parent"
                android:background="#FFE500"
                android:layout_weight="1">
            </LinearLayout>

            <LinearLayout
                android:layout_width="match_parent"
                android:layout_height="match_parent"
                android:background="@color/black"
                android:layout_weight="1">
            </LinearLayout>

        </LinearLayout>

    </LinearLayout>

    <LinearLayout
        android:layout_width="match_parent"
        android:layout_height="match_parent"
        android:layout_weight="1"
        android:background="#0022FF">
    </LinearLayout>

</LinearLayout>

14. Kotilin 코드로 레이아웃 화면 만들기
- 프로젝트 새로 생성 후 > 기본 XML 파일 삭제 > 에러 뜨는 라인 주석 처리
package kr.jeongmo.kotlin_code_layout

import android.graphics.Color
import androidx.appcompat.app.AppCompatActivity
import android.os.Bundle
import android.widget.LinearLayout

class MainActivity : AppCompatActivity() {
    override fun onCreate(savedInstanceState: Bundle?) {
        super.onCreate(savedInstanceState)
//        setContentView(R.layout.activity_main)

        val params = LinearLayout.LayoutParams(
            LinearLayout.LayoutParams.MATCH_PARENT,
            LinearLayout.LayoutParams.MATCH_PARENT
        )
        val baseLayout = LinearLayout(this)
        baseLayout.orientation = LinearLayout.VERTICAL
        baseLayout.setBackgroundColor(Color.rgb(0, 255, 0))
        setContentView(baseLayout, params)
    }
}
- 버튼 코드 추가
val btn = Button(this)
btn.text = "버튼입니다."
btn.setBackgroundColor(Color.MAGENTA)
baseLayout.addView(btn)

btn.setOnClickListener {
    Toast.makeText(applicationContext, "코드로 생성한 코드입니다.", Toast.LENGTH_LONG)
}
공부 과정을 정리한 것이라 내용이 부족할 수 있습니다.
부족한 내용은 추가 자료들로 보충해주시면 좋을 것 같습니다.
읽어주셔서 감사합니다 :)