Android (layout파일생성, id 속성, width height 속성, background 속성, padding margin 속성, visibility 속성, enabled clickable 속성, rotation 속성, 텍스트뷰 TextView, XML + 코틀린 코드, button editText)
1. layout 파일 생성
- res > layout > new > layout 파일 생성

- File name : 파일명 / Root element : xml 유형
2. id 속성
<?xml version="1.0" encoding="utf-8"?>
<LinearLayout xmlns:android="http://schemas.android.com/apk/res/android"
    xmlns:app="http://schemas.android.com/apk/res-auto"
    xmlns:tools="http://schemas.android.com/tools"
    android:layout_width="match_parent"
    android:layout_height="match_parent"
    tools:context=".MainActivity">

    <TextView
        android:id="@+id/textView1"
        android:layout_width="wrap_content"
        android:layout_height="wrap_content"
        android:text="성별 선택"/>

    <RadioButton
        android:id="@+id/female"
        android:layout_width="wrap_content"
        android:layout_height="wrap_content"
        android:text="여성"/>

    <RadioButton
        android:id="@+id/male"
        android:layout_width="wrap_content"
        android:layout_height="wrap_content"
        android:text="남성"/>

</LinearLayout>
3. layout_width, layout_height 속성
- match_parent : 이름 그대로 자신의 부모에 너비나 높이를 맞춘다는 의미
- wrap_content : 글자가 꼭 들어갈 정도로 자신이 너비나 높이를 설정한다는 의미
<?xml version="1.0" encoding="utf-8"?>
<LinearLayout xmlns:android="http://schemas.android.com/apk/res/android"
    android:orientation="vertical"
    android:layout_width="match_parent"
    android:layout_height="match_parent">

    <Button
        android:layout_width="match_parent"
        android:layout_height="wrap_content"
        android:text="버튼입니다."/>

</LinearLayout>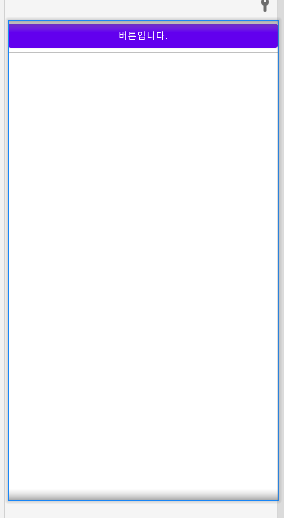
<Button
    android:layout_width="1080px"
    android:layout_height="1920px"
    android:text="버튼입니다."
    />
- px 처럼 절댓값으로 설정 할 수 있지만, 기기마다 크기가 달라서 match 또는 wrap 크기로 지정
4. background 속성
- 위젯의 색상을 주로 RGB 값으로 지정
<?xml version="1.0" encoding="utf-8"?>
<LinearLayout xmlns:android="http://schemas.android.com/apk/res/android"
    xmlns:tools="http://schemas.android.com/tools"
    android:orientation="vertical"
    android:layout_width="match_parent"
    android:layout_height="match_parent"
    android:background="#ff0000"
    >

    <Button
        android:layout_width="match_parent"
        android:layout_height="wrap_content"
        android:background="#00ff00"
        android:text="버튼입니다." />

</LinearLayout>
- 레이아웃 전체는 빨강, 버튼은 초록으로 지정
5. padding, margin 속성
- padding : 상하좌우 모두에 여백을 지정하는 속성
- 각각 넣고 싶으면 paddingTop, padiingBottom, paddingLeft, paddingRight를 사용
<?xml version="1.0" encoding="utf-8"?>
<LinearLayout xmlns:android="http://schemas.android.com/apk/res/android"
    android:orientation="vertical"
    android:layout_width="match_parent"
    android:layout_height="match_parent"
    android:padding="30dp">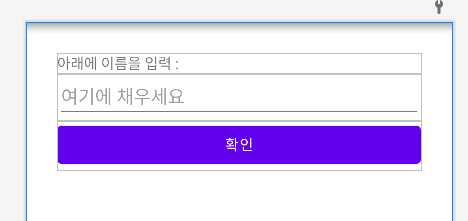
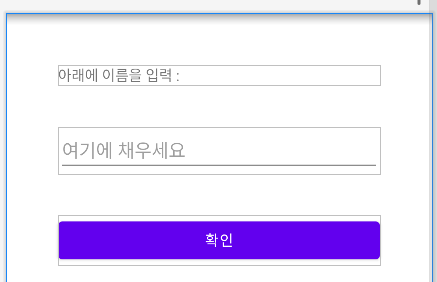
- margin
<TextView
    android:layout_width="match_parent"
    android:layout_height="wrap_content"
    android:layout_margin="20dp"
    android:text="아래에 이름을 입력 : " />

<EditText
    android:layout_width="match_parent"
    android:layout_height="wrap_content"
    android:layout_margin="20dp"
    android:hint="여기에 채우세요"/>

<Button
    android:id="@+id/button1"
    android:layout_width="match_parent"
    android:layout_height="wrap_content"
    android:layout_margin="20dp"
    android:text="확인"/>
6. visibility 속성
- 위젯을 보일 것인지 여부를 설정
<?xml version="1.0" encoding="utf-8"?>
<LinearLayout xmlns:android="http://schemas.android.com/apk/res/android"
    android:orientation="vertical"
    android:layout_width="match_parent"
    android:layout_height="match_parent">

    <Button
        android:layout_width="match_parent"
        android:layout_height="wrap_content"
        android:text="버튼1"/>
    <Button
        android:layout_width="match_parent"
        android:layout_height="wrap_content"
        android:visibility="invisible"
        android:text="버튼2"/>
    <Button
        android:layout_width="match_parent"
        android:layout_height="wrap_content"
        android:visibility="visible"
        android:text="버튼3"/>
    <Button
        android:layout_width="match_parent"
        android:layout_height="wrap_content"
        android:visibility="gone"
        android:text="버튼4"/>
    <Button
        android:layout_width="match_parent"
        android:layout_height="wrap_content"
        android:text="버튼5"/>


</LinearLayout>
7. enabled, clickable 속성
- 사용가능과 클릭가능을 설정하는 속성
<?xml version="1.0" encoding="utf-8"?>
<LinearLayout xmlns:android="http://schemas.android.com/apk/res/android"
    android:orientation="vertical"
    android:layout_width="match_parent"
    android:layout_height="match_parent">

    <Button
        android:layout_width="match_parent"
        android:layout_height="wrap_content"
        android:text="버튼 1"/>
    <Button
        android:layout_width="match_parent"
        android:layout_height="wrap_content"
        android:enabled="false"
        android:text="버튼 2"/>
    <Button
        android:layout_width="match_parent"
        android:layout_height="wrap_content"
        android:clickable="false"
        android:text="버튼 3"/>

</LinearLayout>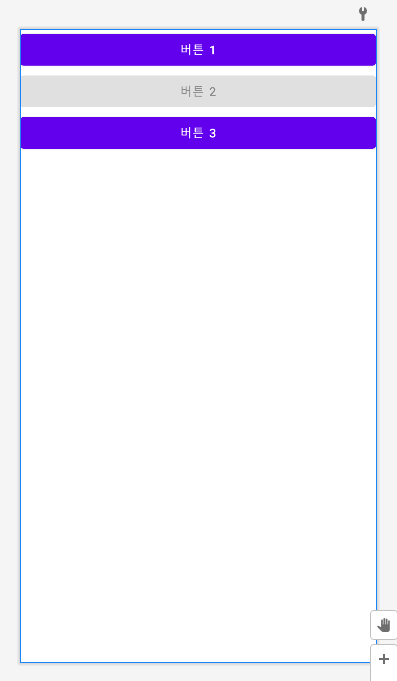
8. rotation 속성
- 회전 관련 속성
<?xml version="1.0" encoding="utf-8"?>
<LinearLayout xmlns:android="http://schemas.android.com/apk/res/android"
    android:orientation="vertical"
    android:layout_width="match_parent"
    android:layout_height="match_parent">

    <Button
        android:layout_width="match_parent"
        android:layout_height="wrap_content"
        android:text="버튼 1"/>
    <Button
        android:layout_width="match_parent"
        android:layout_height="wrap_content"
        android:text="버튼 2"/>
    <Button
        android:layout_width="match_parent"
        android:layout_height="wrap_content"
        android:rotation="45"
        android:text="버튼 3"/>

</LinearLayout>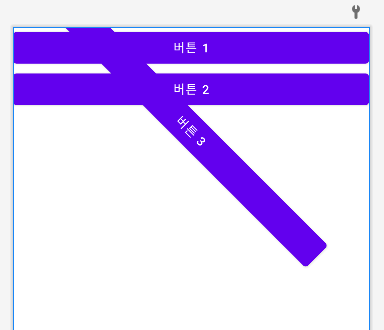
9. 텍스트뷰 TextView
- text : 텍스트위에 나타나는 문자열 표현
- textSize : 텍스트 크기
- typeface : 글꼴 지정
- textStyle : 글자의 스타일, 기울임, 굵게 등 지정
<?xml version="1.0" encoding="utf-8"?>
<LinearLayout xmlns:android="http://schemas.android.com/apk/res/android"
    android:orientation="vertical"
    android:layout_width="match_parent"
    android:layout_height="match_parent">

    <TextView
        android:layout_width="wrap_content"
        android:layout_height="wrap_content"
        android:text="textSize 속성"
        android:textSize="30dp"/>
    <TextView
        android:layout_width="wrap_content"
        android:layout_height="wrap_content"
        android:text="textColor 속성"
        android:textColor="#00FF00"
        android:textSize="30dp"/>
    <TextView
        android:layout_width="wrap_content"
        android:layout_height="wrap_content"
        android:text="textStyle 속성"
        android:textStyle="bold|italic"
        android:textSize="30dp"/>
    <TextView
        android:layout_width="wrap_content"
        android:layout_height="wrap_content"
        android:text="typeface 속성"
        android:typeface="serif"
        android:textSize="30dp"/>
    <TextView
        android:layout_width="wrap_content"
        android:layout_height="wrap_content"
        android:text="singleLine 속성singleLine 속성singleLine 속성"
        android:singleLine="true"
        android:textSize="30dp"/>

</LinearLayout>
10. XML 코드 + 코틀린 코드
<?xml version="1.0" encoding="utf-8"?>
<LinearLayout xmlns:android="http://schemas.android.com/apk/res/android"
    xmlns:app="http://schemas.android.com/apk/res-auto"
    xmlns:tools="http://schemas.android.com/tools"
    android:layout_width="match_parent"
    android:layout_height="match_parent"
    android:orientation="vertical"
    tools:context=".MainActivity">

    <TextView
        android:id="@+id/textView1"
        android:layout_width="match_parent"
        android:layout_height="wrap_content"
        android:text="TextView 연습 1"/>
    <TextView
        android:id="@+id/textView2"
        android:layout_width="match_parent"
        android:layout_height="wrap_content"
        android:text="TextView 연습 2"/>
    <TextView
        android:id="@+id/textView3"
        android:layout_width="match_parent"
        android:layout_height="wrap_content"
        android:text="TextView 연습 3"/>

</LinearLayout>
package kr.jeongmo.newproject_0416_02

import android.graphics.Color
import android.graphics.Typeface
import androidx.appcompat.app.AppCompatActivity
import android.os.Bundle
import android.widget.TextView

class MainActivity : AppCompatActivity() {
    override fun onCreate(savedInstanceState: Bundle?) {
        super.onCreate(savedInstanceState)
        setContentView(R.layout.activity_main)

        val textView1 = findViewById<TextView>(R.id.textView1)
        val textView2 = findViewById<TextView>(R.id.textView2)
        val textView3 = findViewById<TextView>(R.id.textView3)

        textView1.setText("안녕하세요?")
        textView1.setTextColor(Color.RED)
        textView2.setTextSize(30.0f)
        textView2.setTypeface(Typeface.SERIF, Typeface.BOLD_ITALIC)
        textView3.setText("가나다라마바사아자차카타파하")
        textView3.setSingleLine()
    }
}
11. 버튼과 에디드텍스트
- 사용자에게서 어떤 값을 받고 반영하는 값 기능
- 간단 계산기 앱 만들기
<?xml version="1.0" encoding="utf-8"?>
<LinearLayout xmlns:android="http://schemas.android.com/apk/res/android"
    xmlns:app="http://schemas.android.com/apk/res-auto"
    xmlns:tools="http://schemas.android.com/tools"
    android:layout_width="match_parent"
    android:layout_height="match_parent"
    android:orientation="vertical"
    tools:context=".MainActivity">

    <EditText
        android:id="@+id/editText01"
        android:layout_margin="10dp"
        android:layout_width="wrap_content"
        android:layout_height="wrap_content"
        android:hint="숫자1"/>
    <EditText
        android:id="@+id/editText02"
        android:layout_margin="10dp"
        android:layout_width="wrap_content"
        android:layout_height="wrap_content"
        android:hint="숫자1"/>
    <Button
        android:id="@+id/btnAdd"
        android:layout_margin="10dp"
        android:layout_width="match_parent"
        android:layout_height="wrap_content"
        android:text="더하기"/>
    <Button
        android:id="@+id/btnSub"
        android:layout_margin="10dp"
        android:layout_width="match_parent"
        android:layout_height="wrap_content"
        android:text="빼기"/>
    <Button
        android:id="@+id/btnMul"
        android:layout_margin="10dp"
        android:layout_width="match_parent"
        android:layout_height="wrap_content"
        android:text="곱하기"/>
    <Button
        android:id="@+id/btnDiv"
        android:layout_margin="10dp"
        android:layout_width="match_parent"
        android:layout_height="wrap_content"
        android:text="나누기"/>
    <TextView
        android:id="@+id/textViewResult"
        android:layout_width="wrap_content"
        android:layout_margin="10dp"
        android:layout_height="wrap_content"
        android:text="계산결과:"
        android:textSize="30dp"
        android:textColor="@color/teal_700"/>


</LinearLayout>
공부 과정을 정리한 것이라 내용이 부족할 수 있습니다.
부족한 내용은 추가 자료들로 보충해주시면 좋을 것 같습니다.
읽어주셔서 감사합니다 :)